
Can I sew a dog bed with sides myself? Yes, you absolutely can sew a dog bed with sides! This guide will walk you through the steps for your very own DIY dog bed tutorial. Making a soft, supportive bed for your pet is a rewarding project, even for those new to stitching.
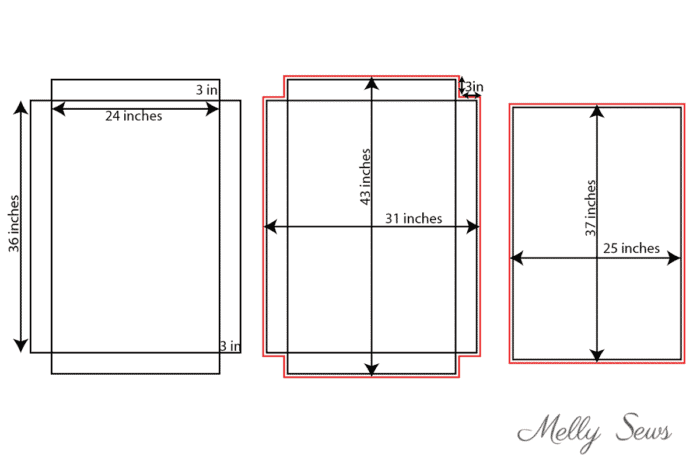
Image Source: mellysews.com
Why Choose a Bolstered Dog Bed?
Bolstered beds, often called donut beds or snuggler beds, have raised sides, or bolsters. Dogs often love these for several reasons. They offer a sense of security. Pets can also rest their heads on the raised edge, which many find very cozy. Creating a bolster dog bed is simpler than it looks. This project is a fantastic choice for beginner sewing projects for pets because it breaks down into manageable sections.
Pre-Sewing Steps: Planning Your Project
Before you grab your sewing machine, good planning saves time later. Think about your dog’s size and habits.
Selecting the Right Size and Pattern
The size of the bed must fit your dog. A good rule of thumb is to measure your dog when they are curled up in their favorite sleeping position. Then, add 6 to 10 inches to those measurements. This gives them space to stretch a little.
We are focusing on a standard round or square bolster design. You will need two main fabric pieces: the base (the cushion part) and the side wall (the bolster).
- For a Square Bed: You need one large square for the base and four rectangular strips for the sides.
- For a Round Bed: You need one large circle for the base and one long rectangular strip that will be curved to form the wall.
Choosing the Best Fabric for Dog Beds
The materials you choose directly impact how long the bed lasts and how much your dog enjoys it. Durability and washability are key factors when deciding on the best fabric for dog beds.
| Fabric Type | Pros | Cons | Ideal Use |
|---|---|---|---|
| Canvas/Duck Cloth | Very strong, resists tearing, easy to wipe clean. | Can feel stiff initially. | Outer cover for heavy chewers. |
| Corduroy | Soft texture, good grip, durable. | Can trap hair easily. | Cozy interior sleeping surface. |
| Outdoor Fabric (e.g., Sunbrella) | Water-resistant, highly durable, fade-resistant. | Can be more expensive. | For outdoor use or very messy dogs. |
| Fleece/Minky | Very soft and warm. | Less durable against claws, can pill over time. | Inner lining for extra comfort. |
Always choose fabrics that are machine washable. This is crucial for making a washable dog bed. Pre-wash and dry all your fabric before cutting. This prevents shrinkage later.
Gathering Your Supplies
List everything you need first. This helps keep the project smooth.
You will need:
- Outer cover fabric (durable option).
- Lining fabric (optional, for added structure or softness).
- Stuffing material (see next section for details).
- Strong thread that matches your fabric color.
- Sewing machine and appropriate needles (heavy-duty needle recommended for thick fabrics).
- Scissors or rotary cutter and mat.
- Ruler or measuring tape.
- Pins or sewing clips.
- Zipper or Velcro (if making the cover removable).
Deciphering Stuffing Options
Choosing stuffing for dog beds greatly affects comfort and support. Do you want a firm bed or a soft one? Does your dog need orthopedic support?
Filling Materials Comparison
| Material | Comfort Level | Support Level | Washability | Cost |
|---|---|---|---|---|
| Polyester Fiberfill | High (soft and fluffy). | Low to Medium. | Very easy to wash. | Low. |
| Shredded Foam | Medium (good cushion). | Medium to High. | Harder to wash; dries slowly. | Medium. |
| Memory Foam (Solid or Shredded) | Very High (great support). | Very High (orthopedic). | Requires a removable cover. | High. |
| Old Pillows/Blankets | Varies widely. | Low. | Easy if using pillow inserts. | Free/Low. |
For a bolster bed, you often use two types of filling: fiberfill for the soft, puffy bolsters, and denser foam or fiberfill for the flat base cushion.
Step-by-Step Sewing Instructions for Pet Bed
This section details the actual construction process. We will focus on a simple square bolster design first. These sewing instructions for pet bed assume you have basic machine knowledge.
Part 1: Creating the Base Cushion (The Center Mat)
The base is the main, flat part where your dog lies.
- Cut the Fabric: Cut two identical squares for the base. Remember to add a 1-inch seam allowance around all sides.
- Sewing the Squares: Place the two fabric squares right sides together (the pretty sides facing inward).
- Stitch: Sew around three full sides of the square using a straight stitch, keeping your seam allowance consistent (e.g., 1 inch).
- Leave an Opening: On the fourth side, stop sewing about 6 to 8 inches before the corner. This gap is vital for turning the fabric right-side out and stuffing it later.
- Turn and Press: Clip the corners diagonally (be careful not to cut the stitching). Turn the entire square right side out. Use a blunt object (like a chopstick) to gently push out the corners neatly. Press the edges flat with an iron.
Part 2: Constructing the Bolster Walls
The bolsters are the raised, tube-like sides that wrap around the base. If you are making a round bed, you will cut one very long rectangle and curve the ends later. For a square bed, you need four separate rectangular strips.
- Measure the Bolster Strip: The length of your strip must equal the perimeter of your base cushion, minus the seam allowances where the sides meet the corners. The width of the strip determines the height of your bolster (e.g., a 10-inch wide strip makes an 8-inch high bolster after seams).
- Sew the Strips: Take your long strip of fabric. Fold it in half lengthwise, right sides together.
- Stitch the Long Edge: Sew along the long edge, creating a fabric tube.
- Closing the Ends (Square Bed Only): For each of the four side pieces, sew the two short raw edges closed. You now have four separate tubes.
Part 3: Attaching the Bolsters to the Base
This step requires careful alignment to ensure the bolster wraps neatly around the center cushion.
- Pinning the First Bolster: Take one finished bolster tube. Align the raw, open edge of the bolster tube with one raw edge of the base cushion opening. Pin it securely, matching the raw edges precisely.
- Stitching the Seam: Sew the bolster strip to the edge of the base cushion. Use the same seam allowance you used before.
- Adding the Next Bolster: Repeat this for the remaining three sides. You are essentially creating a square “frame” with the bolsters attached to the edges of the center mat. Crucially, do not sew the bolster strips to each other yet.
Part 4: Finishing the Bolster Shape and Stuffing
Now we connect the bolsters to form the continuous ring.
- Joining the Bolsters: Take the two ends of the bolster strips that meet at a corner. Overlap them slightly and pin them together securely. Sew them shut. Now, the bolster forms a complete ring around the base.
- Stuffing the Bolster: Locate the opening left in the base cushion (from Step 1, Part 1). Start pushing your chosen stuffing (fiberfill works well here) into the bolster tubes first. Use a long stick or dowel to push the stuffing evenly toward the corners. This ensures the sides are firm and round.
- Stuffing the Base: Once the bolsters are firm, begin stuffing the flat base cushion through the opening. Stuff firmly, but not so tightly that the fabric strains.
- Closing the Hole: Once both sections are stuffed to your liking, use a hand-sewing technique (like a ladder stitch or invisible stitch) to close the opening neatly. This creates a professional finish for your pet cushion construction.
Advanced Tip: Creating Removable Covers
For easier cleaning, many sewers opt for a removable cover system. This means you sew an inner liner filled with stuffing, and then sew an outer cover that fits over it.
- The outer cover will have long zippers or heavy-duty Velcro sewn into the seams.
- This allows you to remove the stuffing, wash the cover, and reassemble later. This is key to making a washable dog bed last longer.
Mastering the Round Bolster Bed
Creating a bolster dog bed that is round is slightly more complex due to curves, but the results are very appealing.
Cutting for a Round Bed
- The Base Circle: Cut two large circles for the bottom cushion.
- The Bolster Strip: Cut one long rectangle. The length is the circumference of your base circle plus seam allowances. The width determines the bolster height, just as before.
Forming the Round Bolster
- Sewing the Tube: Sew the long edges of the strip together to form one large tube. Do not close the ends yet.
- Curving the Tube: This is the tricky part. You must gently curve the long tube to match the circumference of the base circle. Pin the raw edge of the bolster tube all the way around the raw edge of one base circle. Pinning the curves evenly is essential. Go slowly, easing the fabric as you pin.
- Stitching the Base: Sew the bolster to the base circle. If you pinned correctly, it should fit without puckering too much.
- Stuffing and Closing: Stuff the bolster first, then the base, leaving an opening for stuffing the base. Close the hole by hand.
- Attaching the Top Circle: Once stuffed, take the second base circle and align its raw edge with the remaining raw edge of the bolster tube. Pin and sew this final seam. This seals the entire bed, making it sturdy.
Maintenance: Keeping the Bed Clean and Fresh
A well-loved dog bed gets dirty fast. Good maintenance ensures longevity and hygiene.
Washing Instructions
If you chose durable materials and used strong thread, machine washing is possible, though often recommended on a gentler cycle.
- Spot Clean First: For minor messes, use mild soap and a sponge.
- Full Wash: If the entire bed needs cleaning, use a large capacity washer. Use cool or warm water, never hot (hot water can degrade foam). Use a mild detergent.
- Drying: Air drying is best, especially for beds filled with foam, as dryers can break down the structure. If you must use a dryer, use the lowest heat setting and toss in a few dryer balls to help redistribute the stuffing.
If you made a bed without a removable cover, washing the entire unit can be heavy and difficult to dry thoroughly. This reinforces the benefit of making covers removable.
Considering No-Sew Dog Bed Alternatives
Not everyone enjoys the sewing machine. If you are looking for a fast solution, no-sew dog bed alternatives exist, though they usually lack the structured sides of a true bolster bed.
Quick No-Sew Options
- Duvet Cover Method: Buy a large, durable duvet cover (or make one by simply folding fabric and securing edges with safety pins or fabric glue). Stuff it with old blankets, towels, or pre-made pillow inserts.
- Sweater Bed: For very small dogs, use a large, old, thick sweater. Stuff the body of the sweater firmly. Then, stitch the neck hole closed by hand. Braid the sleeves and wrap them around the body, securing the ends underneath to form a soft, circular rim.
While these are fast, they will not offer the structured, supportive bolsters you get from following a true DIY dog bed tutorial.
Finishing Touches and Customization
The final details personalize your project. These comfortable dog bed patterns can be adapted in many ways.
Adding Zippers or Velcro
If you planned for a removable cover, installing the zipper or Velcro is the next big step after sewing the outer pieces together.
- Zipper Placement: The zipper usually runs along one side of the base or one seam of the bolster. This needs to be done before you sew the cover pieces permanently together.
Decorative Elements
- Piping: Adding piping (a decorative cord sewn into the seam allowance) around the edge of the bolster gives a very tailored, professional look.
- Patches or Embroidery: Personalize the fabric with your dog’s name using iron-on letters or embroidery before you assemble the main pieces.
Fathoming Seam Allowance and Stitch Strength
The strength of your stitching directly relates to the bed’s lifespan. Dogs dig, scratch, and chew.
Stitch Selection
Use a straight stitch for piecing the main sections together. For high-stress areas, like where the bolsters meet the base, consider using a zig-zag stitch over the initial straight seam. This locks the threads down and adds reinforcement.
Needle Choice
If you are using heavy canvas or denim, switch your standard sewing machine needle to a “Denim” or “Heavy Duty” needle. A dull or thin needle will snap or skip stitches when working through thick layers of fabric and stuffing.
Frequently Asked Questions (FAQ)
How much fabric do I need for a large dog bed?
For a 36-inch round bed, you will need approximately 3 to 4 yards of fabric for the outer shell, depending on the bolster height and whether you are using a lining. Always buy a little extra fabric to account for pattern matching or cutting errors.
What is the difference between a bolster bed and a pillow bed?
A pillow bed is typically a flat cushion, often stuffed with loose fiberfill or foam pieces. A bolster bed has raised, distinct sides (bolsters) that provide a rim for the dog to lean against or curl into for security.
Is it safe to use old blankets as stuffing?
Yes, old blankets, towels, or clothing make excellent, budget-friendly stuffing. Ensure they are thoroughly washed and completely dry before using them. However, be aware that soft materials like old blankets offer less firm support than foam.
Can I make a memory foam dog bed without sewing?
You can easily create a supportive base by purchasing a large sheet of orthopedic memory foam cut to size. Then, wrap it tightly in a thick fleece blanket or an old duvet cover and secure it firmly with heavy-duty snap closures or Velcro straps. This creates a stable base, but adding true bolsters without sewing is very difficult.
What is the best way to stuff the bolster so it stays firm?
Stuff the bolster firmly and evenly, using your hands to push the stuffing deep into the tube. If using fiberfill, you can place a thin strip of craft foam or pool noodle piece inside the center of the tube before stuffing with fiberfill around it. This gives the bolster a strong core shape.